Tammy and I
Sincerely Appreciate Your Patronage


TriggerShims
Links Page
👈 Index Left Side of Page
Buy American

I Will Defend Our Right to Keep and Bear Arms
~ Donald John Trump
~ Comments? Send Lance an Email ~
TriggerShims
General Shim Instructions
Rebellion Against Tyrants is Obedience to God
~ Benjamin Franklin ~
Manufacturer of
Trigger Shims Brand
American Made Gun Shims
- Home of -
TriggerShims.com
GunShims.com
ShivelySales.com
MichiganCenterOutdoors
SmallShims.com
Gun ShimsGun Smith Supplies
America's Largest Gun Shim Company Since 2008
WWG1WGA
We Manufacture the Widest Selection of Gun Shims to be Found Anywhere on the Planet
100% American Family Owned
Shively Sales - Manufacturer of
TriggerShims Brand
Gun Shims
in
Michigan Center, Michigan
"Better to be poor and honest than to be dishonest and rich." Proverbs 28:6

God Bless the U.S.A.
PAGE INDEX
General Shim Instructions
Measuring and Shim Installation Instructions
Ruger 10/22 Shim Installation Instructions Page Link
These General Measurement Instructions Below are for Ruger Double Action Revolvers - GP100, SP101, RedHawk, Super Red Hawk and Alaskan, Security Six, Speed Six, and Police Service Six but generally apply to Most Firearms.
Trigger assembly and Hammer assembly Measurements are generally done in the same way.
In the Video Example below I show the basic way to measure the Hammer Clearance to fit and install Hammer Shims.
Fitting and installing Trigger Shims would follow this same basic example.
These General Measurement Instructions are for Ruger Double Action Revolvers, but generally apply to Most Firearms.
Trigger Shimming; Use the Feeler Gauge to Measure the Total Side Play
between One Side of the Trigger and the Frame. In this example there will be about .009” trigger side play, yours may vary.
Subtract .002” to .004" for Ending Clearance and divide the remainder by 2.
In the example of an .009” gap, .009" - .003" (.002" to .004") =.006”; .006"/2=.003”
Take two shim washers .003” thick and install them on both sides of the trigger.
This will serve as a bearing surface and will keep the trigger from moving sideways when pulled. It will reduce friction and force the Trigger to make a more uniform contact with the Hammer.
In the case of Trigger/Frame clearance of less than .006" a single .002" or .003" shim installed on the Left Side of the Trigger will give benefit to a Right Handed Shooter.
After installing the shims, make sure the trigger moves freely with No Binding.
I Do Not Recommend shimming tighter than .002" on the Trigger.
Hammer Shimming; With the Hammer Main Spring Removed to Relieve Tension, Measure the Total Gap between One Side of the Hammer and the Frame.
Unlike the Trigger, you will generally see a little more Clearance at the Hammer.
This Clearance allows the Hammer to Rub the Frame, Causing Drag.
Look at the Sides of the Hammer, if you see Arc-Like Scratches, it means the Hammer has been Dragging on the Frame.
This Reduces Hammer Thrust and Speed, and in Extreme Instances could cause Light Strikes.
Installing a Shim at the Hammer’s Pivot Point Reduces Side Play, and adds a Bearing to Reduce Friction and Prevents the Hammer from Rubbing on the Frame.
Use the same formula for the Hammer as the Trigger.
Use the Feeler Gauge to measure the Total Side Play between one side of the Trigger and the Frame. After the Hammer Pivot Pin is seated, Check the Hammer for Free Movement, and be sure there is No Binding.
In this example there will be about .012" Hammer Side Play, yours may vary.
Subtract .002” to .004" for Ending Clearance and divide the remainder by 2.
In the example of an .014” gap, .014" - .004" (.002" to .004") =.010”; .010"/2=.005”
Take two shim washers .005” thick and install them on both sides of the Hammer.
The best way to do this is to install the Hammer then slide the Shim down the side of the Hammer.
Use a Feeler Gauge Blade to push the shim into position.
I Do Not Recommend shimming tighter than .003" on the Hammer.
Ruger Double Action Hammer Dog Shims;
Shimming a Loose Hammer Dog can help with Double Action Trigger Pull.
Use a Feeler Gauge to Measure Total Clearance, and allow a minimum .002" after Installing Shims
Shims are available in .002" through .009"
I Do Not Recommend shimming tighter that .002" on the Hammer Dog
Barrel-Cylinder Gap and Endshake;
The gap between the back of the barrel and the front of the cylinder is known as the Barrel-Cylinder (B-C) gap. The Front-To-Back Movement of the Cylinder is the Endshake.
In order to properly measure these clearances you will need a Feeler Gauge Set. K-D Tools USA Made # 161 Deluxe Feeler Gauge is available all over the internet and at most good auto parts stores for under $10
To check B-C gap, hold the cylinder rearward and insert the (thickest that will fit) feeler between the Barrel and the Cylinder, this is your Barrel-Cylinder Gap, write it down, it should be between .004" and .008"
Next, hold the cylinder forward and re-check the gap, write it down.
There may be no clearance here at all, the cylinder may touch.
The difference between the two numbers is the amount of movement or Endshake your cylinder has, it should be between .001" and .004" on most Ruger Double Action Revolvers, other manufacturers clearances may vary
Our Cylinder Shims can be used to adjust your B-C Gap and Endshake.
Available in the following thicknesses; .002", .003", .004", .005", .006", .007", 008" and .009"
v.1t Item # FG161D
TECH TOOL TIP: USA Feeler Gauge
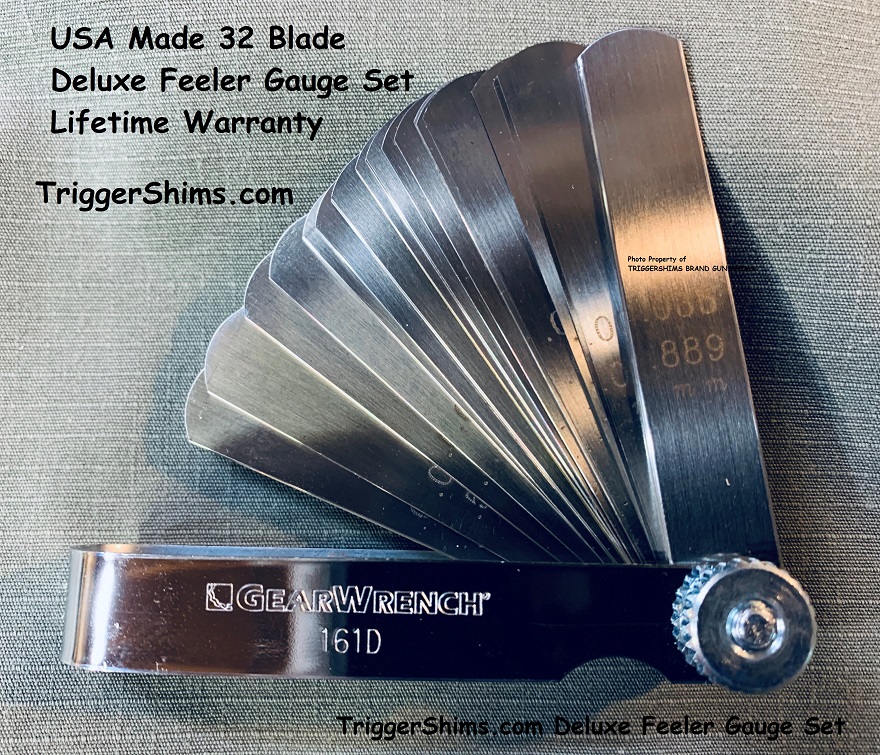
The easiest way to Measure your Trigger or Hammer assembly or your Cylinder Endshake is with a simple blade type feeler gauge.
I sell a Nice U.S.A. Made set you can include in your orders.
It comes with a Manufacturers Lifetime Warranty
This 32 Blade Gauge will measure from .0015" up and is perfect for general use.
The price is $18.95 and includes Free First Class Shipping and Tracking USA
Price includes Free Shipping and Tracking in USA Only ~ Sorry No Exports ~
Bolt Shim Instructions
LANCE'S TECH TIP:
Rimfire Bolt Shim Installation
~ A General Guide ~
Unlike centerfire cartridges where headspace is on the shoulder, .22 LR is rim headspaced—the dimension from the bolt face to the barrel breech face (rim seat) determines how much "play" or clearance the cartridge rim has.
Rimmed Cartridges use the thickness of the cartridge rim for head-spacing.
.22 Rimfire Cartridges Headspace on the Case Rim.
The Actual Headspace is in the Recessed Face of the Bolt.
You Must Make Sure this Recessed Bolt Face is Equal To or Deeper Than Your Rim for Safety
Generally speaking, there is extra room left in production guns between the Bolt and Breech to accommodate a wide variety of ammunition with varying rim thicknesses.
You should first measure the depth of your bolt face pocket to ensure it meets SAAMI Headspace minimum depth.
Shimming between the two bolt halves ensures the bolt is seating the cartridge up gently against the breech with your chosen brand of ammunition.
You can use our color-coded numbered shims like a gauge to find when the bolt face touches the barrel breech face, and then calculate where you want to be with your bolt headspace depth and rim thickness measurements.
I cannot tell you which shim best works with your rifle; you decide that yourself by fitting and feel and by shooting.
Installing Bolt Shims requires fitting by hand and checking with the Bolt installed in the Rifle and Locked Down - you do not measure with the Bolt out of the Rifle.
To establish the Bolt/Breech fit, shims are installed and fitted on an empty chamber.
If possible, it may give you a better feel if you leave the extractors off some rifles while fitting shims.
Start with a 4 or 5 pack of shims, install the .0015" or .002" thinnest shim and see how your bolt closes. If it seems to close as normal, then continue to install each thicker shim until the bolt starts to close harder than normal, stacking shims if necessary.
At the point where your bolt begins to close hard, that was the amount of slack that was in your bolt, measured by whatever shim or shims combined were needed to bring the bolt up tight to the breech.
Now it is best to remove that shim and step back one number. For example, if a .005" Red Shim causes the bolt handle to close harder than normal, then take it out and install a .004" Purple Shim.
If you have to force or put undue stress on your bolt to close it, you should reduce the number of shims.
You will generally only use 1 of the 4 or 5 shims in the package, but you can stack shims together if needed.
When you have the correct shim installed, your bolt should close normally or just (ever-so) slightly tighter than normal.
If the bolt closes slightly tight, it is best to back up one step, remove .001".
Put a very small drop of oil on the shim.
Now you can go to the range and, with the barrel pointed in a safe direction, once again check fit with your favorite ammo.
Due to variations in rim thickness, you may have to reduce the thickness of shims. Remember, you have already removed all the excess headspace from the bolt/breech, so now the only thing to do is remove thickness (shims) if/as needed to get to your sweet spot or required headspace for the rim thickness of your favorite cartridge.
For longest shim life, use a drop of oil or a (very small amount of) grease on your shim.
If you have to force or put undue stress on your bolt to close it, you should reduce the number of shims.
A minimum of clearance should be maintained while maintaining proper headspace. Do not put undue stress on the bolt by shimming too tightly as it is unnecessary!
At no time do you want to force the bolt to close or to crush the rim. Did I explain that clearly?
Forcing the Bolt to Close will put premature wear on the bolt shims and will not increase accuracy.
If you have any questions, use a headspace gauge to check for proper headspace.
Bolt Shims have in many instances cured light strikes.
Will they help with accuracy? Don't take my word for it. Read our Customer Reviews or ask our Customers.
Simply Chambering More Consistently Yields More Consistent Results.
Your Satisfaction is Guaranteed. If you feel you receive no benefit, you may send your shims back to TriggerShims for a Full Refund.
Click Here to Open Instructions in a Printable PDF:
LANCE'S TECH TIP: Rimfire Bolt Shim Installation Instructions
TriggerShims.com Shim Thickness Color Code
All TriggerShims Gun Shims are Made in the USA from Precision Brand American Made 304 Stainless Steel Stock and have a Guaranteed Factory Tolerance of plus or minus 10%.
Shims are marked with colored permanent marker that will wear off or strip off with oils or solvents.
If you are testing, plan on keeping your shims in separate marked small envelopes or using a micrometer.
* Bolt Shims available .0015" - .005"
- .0015" - Yellow
- .002" - Black
- .003" - Blue
- .004" - Purple
- .005" - Red
- .006" - Orange
- .007" - Green
- .008" - Pink
- .009" - Brown
- .010" - Yellow

TriggerShims Bolt Shim Instructions Copyright 2008 - 2025 V7/2025
#SHIP-V2.2
UPGRADE FROM FREE ECONOMY SHIPPING ~to~ TRACKING w/ SHIPPING PROTECTION #ESU
~ USA ONLY ~
~ $6.00 Tracking UPGRADE ~
NOW Includes
~ SHIPPING PROTECTION* ~
~ USA ONLY ~
Upgrade from FREE ECONOMY MAIL to
Bubble Pak w/ Tracking
(USA Only) Orders - Add TRACKING $6.00 - USA ONLY
NOTE: Free Shipping Shim orders DO NOT include Tracking!
Shims are sent via White Envelope Snail Mail - Ground - No Insurance
If you want Tracking Upgrade, this is the place.
THIS IS FOR TRACKING
~Click the ADD TO CART button below ANYTIME BEFORE WE SHIP ~
Tracking and Replacement for Items Lost or Damaged During Shipping
Please Do Not Duplicate Your Order to Add This Upgrade
Continental USA, AK & HI ONLY
* USPS Ground Advantage™ Service
* Replacement for items lost or damaged during shipping
We Cheerfully accept Cash, Money Order, and Credit Cards through our Secure PayPal Check-Out
All Website Orders are Shipped the Next Business Day
I will Ship Shims to USA, Canada and International
Gun Parts Shipped to USA Only

"American Made Gun Shims" - GunShims.com - TriggerShims.com
and
TriggerShims is a Trademark
of
Shively Sales
Michigan Center, Michigan
All Material Copyright of Lance Shively
2008 ~ 2025
God Bless and Make America Great Again!
BY PURCHASING SHIVELY SALES PRODUCTS
YOU ASSUME ALL RESPONSIBILITY FOR THEIR SAFE INSTALLATION AND USAGE.
YOU RETAIN ANY AND ALL RESPONSIBILITY FOR YOUR OWN ACTIONS. Be Safe!!
If you have any questions or safety concerns, see a qualified Gunsmith.
I manage this site myself, Please Report Any Website Problems to;
Lance at Webmaster@TriggerShims.com
I Reserve the Right to Refuse Service to Anyone
Republic.... I like the sound of the word. It means people can live free, talk free, go or come, buy or sell, be drunk or sober, however they choose. Some words give you a feeling. Republic is one of those words that makes me tight in the throat - the same tightness a man gets when his baby takes his first step or his first baby shaves and makes his first sound as a man. Some words can give you a feeling that makes your heart warm. Republic is one of those words. - John Wayne in the Alamo